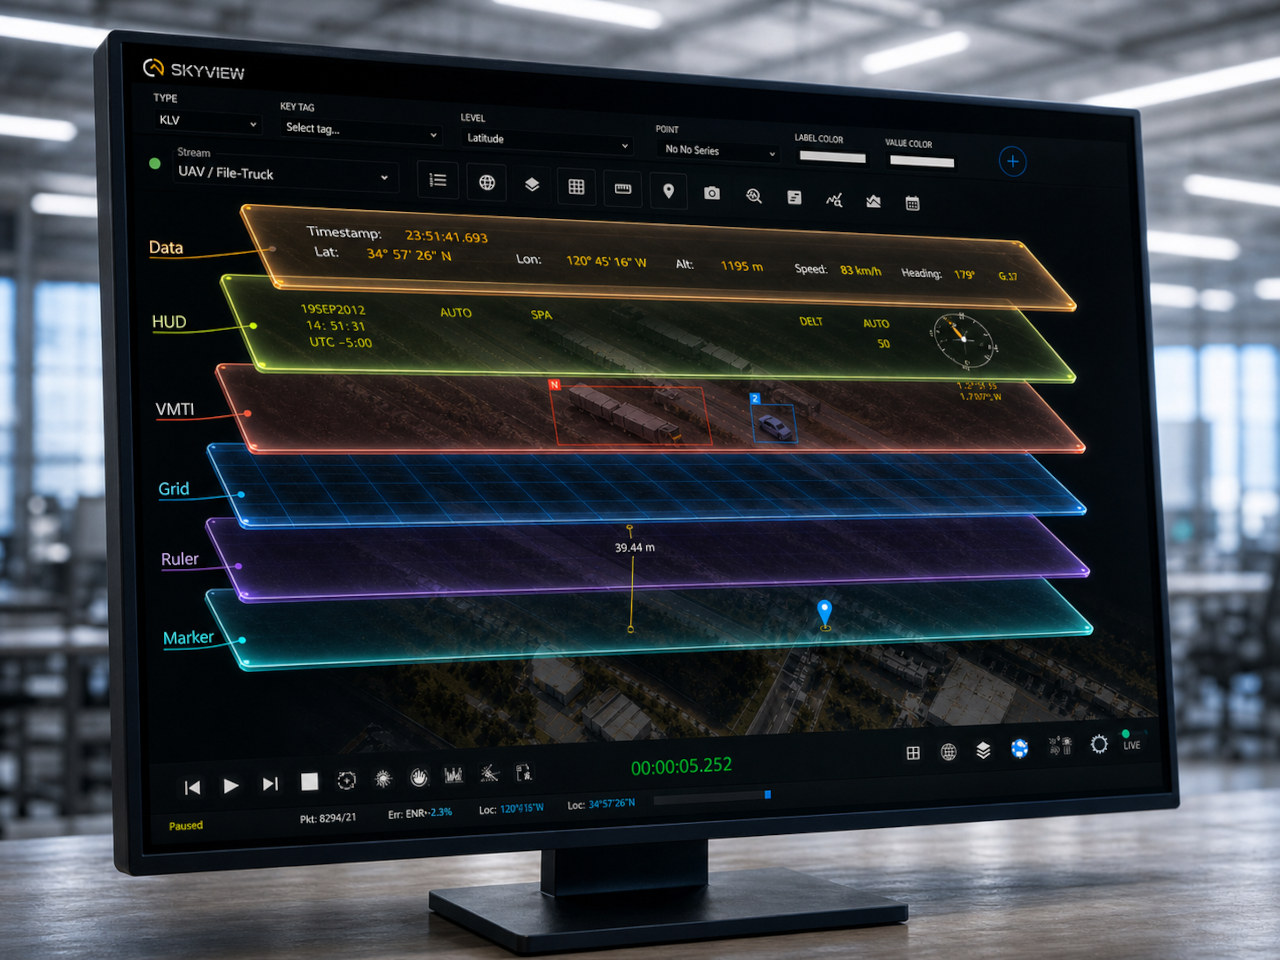
Video Overlay
Overview
The Video Overlay subsystem renders on-screen objects over video playback (e.g. timestamps, KLV metadata, FOV cones). Overlay can be enabled and configured in the player UI.
Enabling overlays
- Use the overlay button in the player controls to toggle overlays on/off.
Modes
The overlay supports two working modes:
- Presentation mode is the viewing mode. Enabled layers keep updating from the incoming packet, but overlay objects are not selectable or transformable.
- Editor mode is the layout-authoring mode. Editable objects such as the compass and data text items can be selected, moved, rotated, and resized. Layer visibility, layer opacity, HUD display mode, and ruler enable state can also be changed and then saved as part of the layout.
- The ruler is a special case: when it is enabled and has valid geometry, it stays visible and its endpoints remain draggable in both modes.
Layers
The overlay is organized into independent layers so the operator can show, hide, or fade each one without affecting the others:
- HUD shows the compass and any regular HUD text items. When HUD display mode is set to
compass, only the compass remains visible and HUD text items are hidden. - Data shows user-defined label/value readouts. These may be static values or live values linked to incoming KLV tags.
- VMTI shows runtime moving-target graphics driven by incoming metadata. This layer is packet-driven and is not used for manual text authoring.
- Grid shows a projected ground-plane grid and north arrow when georeferencing is available.
Metadata required for presentation:
- HUD compass:
headingis the primary live input.terrainOrientationcan also be supplied, and georeferenced KLV can further improve projected orientation. - Data layer, static item: no incoming metadata is required after the item is created.
- Data layer, KLV-backed item: the selected KLV tag, or selected nested tag path, must be present in the incoming packet.
- VMTI layer: KLV tag
74must be present, with74.8frame width,74.9frame height, and at least one renderable target in74.101. - Grid layer: MISB ST 0601 frame georeferencing is required. Use either full-frame corners
82-89, or frame center23and24plus offset corners26-33.
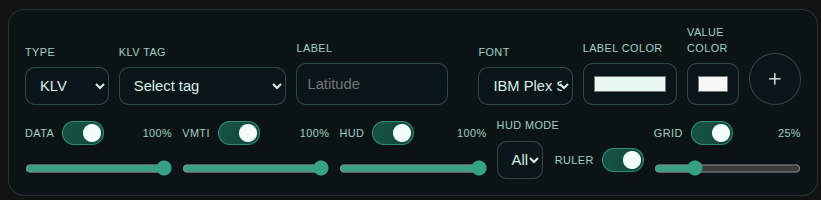
Editor
The Editor is used to create and maintain the saved overlay layout.
To add an item:
- Switch to Editor mode.
- Choose the item source: Static or KLV.
- Enter the label and appearance settings.
- For a Static item, also enter the fixed value to display.
- For a KLV item, select the tag to read from the live packet, then add the item. New items are placed at the next default position in the layout.
To update an item:
- Select the existing data item on the canvas or from the editor state.
- Change its label, source, tag selection, colors, font, or timestamp format as needed.
- Drag the selected item to move it. Use the transform handles to resize text and rotate it.
To remove an item:
- Select the existing data item.
- Use the delete action in the editor panel.
- Removal applies only to authored data items. Runtime-generated layers such as VMTI are not deleted from the incoming metadata stream by the editor.
The Editor supports two kinds of data text items:
- Static item: both the label and the value are saved in the layout and remain fully user-controlled.
- KLV-backed item: the label is part of the saved layout, but the value is always read from the current packet. As the packet changes, the displayed value changes automatically.
KLV tags and nested standards are handled as follows:
- A top-level MISB ST 0601 field is selected by its tag number, for example
13or23. - If that tag contains a nested local set or subordinate standard, select the nested field as a
parent.childpath such as74.8or74.101. - If the nested selector is left at Whole local set, the item points to the parent tag itself rather than to one child field.
- Nested standards are therefore treated as subordinate KLV paths, not as separate overlay objects. The parent tag identifies the local set, and the nested tag identifies the field inside that local set.
- Timestamp-format controls appear only for timestamp tags. Those values can be displayed as local time or ISO 8601.
Metadata required for presentation:
- Static item: no live metadata is required after the item is saved.
- KLV-backed item: the selected top-level tag or nested
parent.childtag path must exist in the incoming packet. - Timestamp item: the selected KLV field must contain a valid timestamp value if you expect formatted time output.
- Saved layout state: item position, rotation, font size, colors, label, source, and selected tag or fixed value are part of the presentation layout.
VMTI
VMTI is a runtime overlay. It is intended for live moving-target presentation, not manual authoring. When valid VMTI metadata is present, the overlay can draw target boxes, centroids, contours, masks, labels, and target colors directly over the image frame.
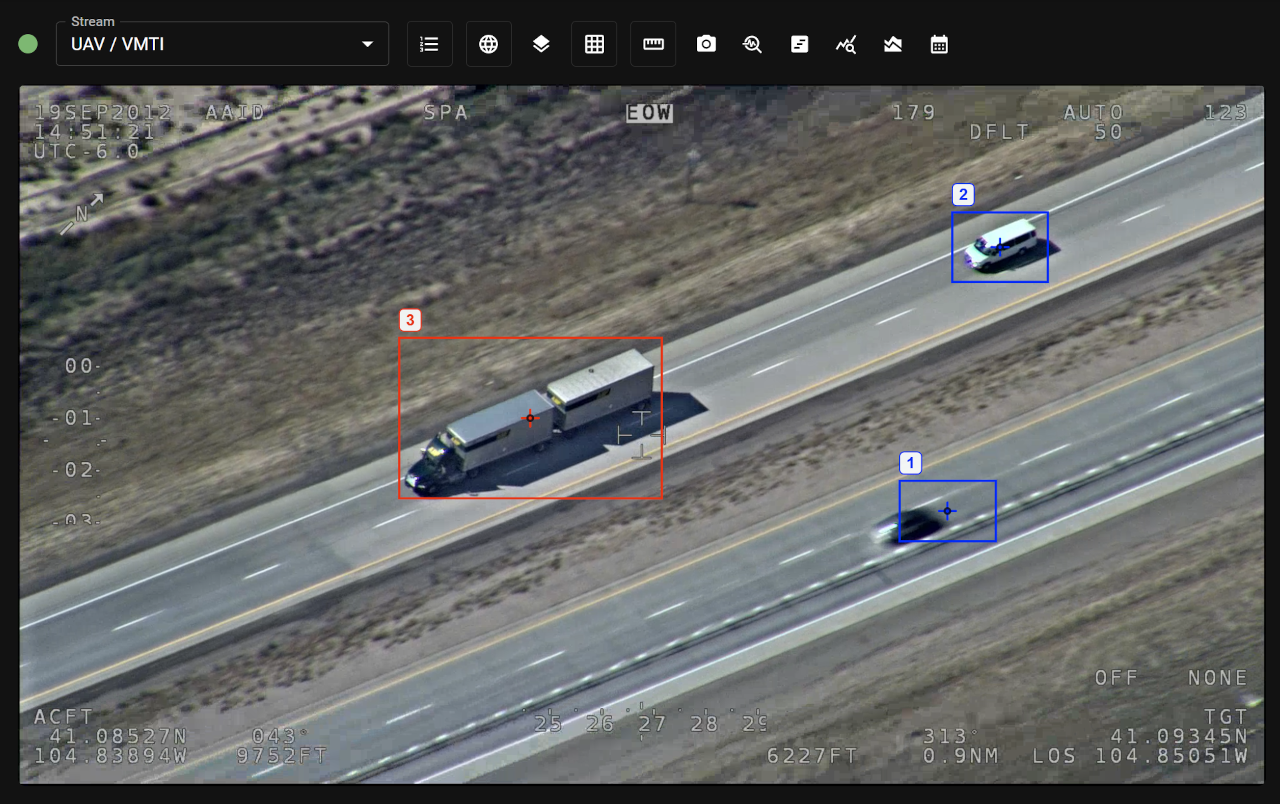
If the VMTI layer is enabled but the required packet fields are missing, no target graphics are presented.
Metadata required for presentation:
- Top-level KLV tag
74for the VMTI local set. 74.8frame width and74.9frame height.74.101target series.- For each target, at least one renderable geometry source such as a bounding box, centroid, contour, or mask.
Grid
The Grid is a read-only ground-reference aid. It is rendered above the ruler and projects a ground-plane grid with a north arrow into image space. It updates automatically as packet georeferencing changes.
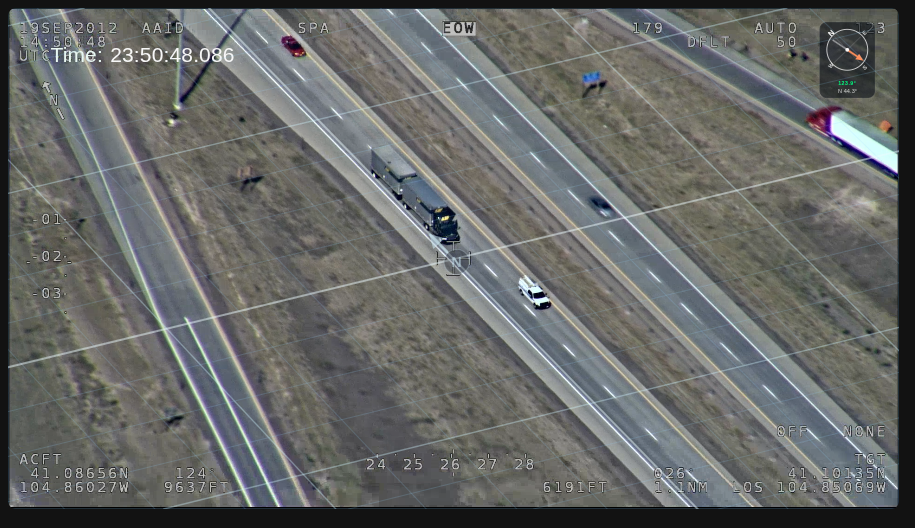
If the Grid layer is enabled without valid frame georeferencing, the layer remains empty.
Metadata required for presentation:
- Full-frame corner georeferencing using tags
82-89, or - Frame center
23and24plus offset-corner tags26-33.
Ruler
The Ruler is a measurement overlay. When enabled, it displays the saved line between its start and end points and continuously recalculates the ground distance from the current georeferencing. Its endpoints remain draggable whenever the ruler is enabled.
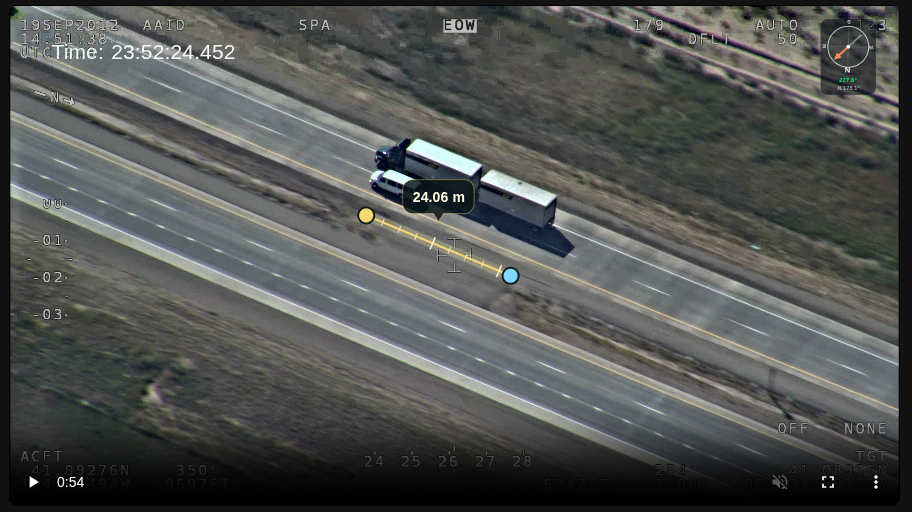
The ruler uses image-space endpoints but ground-referenced distance. This means the line stays anchored to the same image positions, while the measured distance can change when the packet georeferencing changes.
Metadata required for presentation:
- Full-frame corner georeferencing using tags
82-89, or - Frame center
23and24plus offset-corner tags26-33. - A saved ruler start point and end point if you expect an immediate visible measurement.
Marker
The Marker is a draggable point overlay that can be used together with the Map Window for quick location inspection and manual correlation between the video and the map.
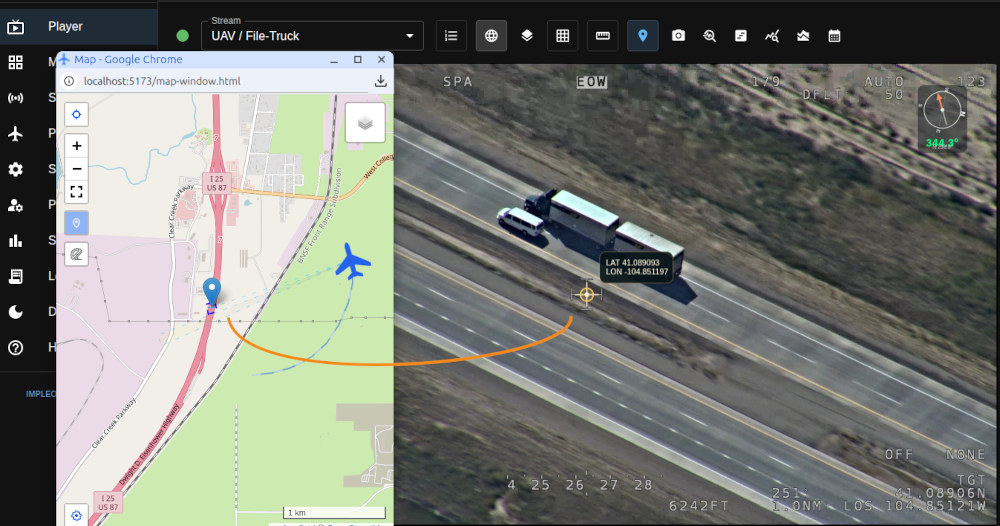
- Use the Marker button in the player toolbar to enable or disable it.
- When the marker is enabled for the first time, it is placed at the center of the video overlay.
- If georeferencing is available, the marker position is resolved to latitude and longitude and can be mirrored into the Map Window.
- In presentation mode, the marker remains draggable even though the rest of the overlay is not in edit mode.
- The marker supports two ownership modes saved in the overlay layout:
- Overlay master means the video overlay marker is the authoritative position. Dragging it in the player updates the Map Window marker when the Map Window is open.
- Map master means the map marker is the authoritative position. Dragging it in the Map Window updates the overlay marker position on the video.
If no valid georeferencing is available, the marker can still be positioned in image space, but map synchronization requires a valid ground projection from the current metadata.
Metadata required for presentation:
- Full-frame corner georeferencing using tags
82-89, or - Frame center
23and24plus offset-corner tags26-33. - A saved or newly created marker point if you expect the marker to be visible immediately after enabling it.
Annotations
Annotations can also be rendered as part of the video overlay.
- Use the Annotations toggle in the player toolbar to enable or disable annotation display.
- When enabled, the overlay loads active annotations that are relevant to the current playback area.
- The same annotation visibility state is shared with the Map Window, so enabling or disabling annotations affects both views together.
- Annotation geometry is presentation data in the overlay. It is displayed on the video, but authored and edited from the Annotations page.
When annotations are enabled, the player loads:
- active server annotations the current user is allowed to access,
- active local annotations stored in the current browser.
To avoid loading unrelated annotations, SkyView narrows the loaded set to the approximate area around the current video geolocation. The resulting annotation set is then rendered over the video overlay.
If annotations are disabled, all annotation graphics are removed from the overlay.
See also Annotations.