Settings and Integrations
About is the final Settings tab and is available to all signed-in users. It shows application information and update controls. See Application updates and About for desktop installation, managed server updates, and recovery.
The administrative Settings tabs are available to tenant administrators and group activation, signing, email, WordPress/WooCommerce, client preferences, and administration. Platform administrators also see the Backup tab. License is shown to platform administrators and in standalone desktop mode; hosted tenant activation is managed by a platform administrator under Admin · Tenants.
✅ Activation
Activation controls what this License Center workspace is allowed to do. An
application license can enable the tenant-products capability, set limits for
administrators, users, products, and active licenses, identify the edition, and
provide an expiration date. Tenant-product signing is included in that
capability. The application license licenses License Center itself; it is
separate from the product licenses issued to customers.
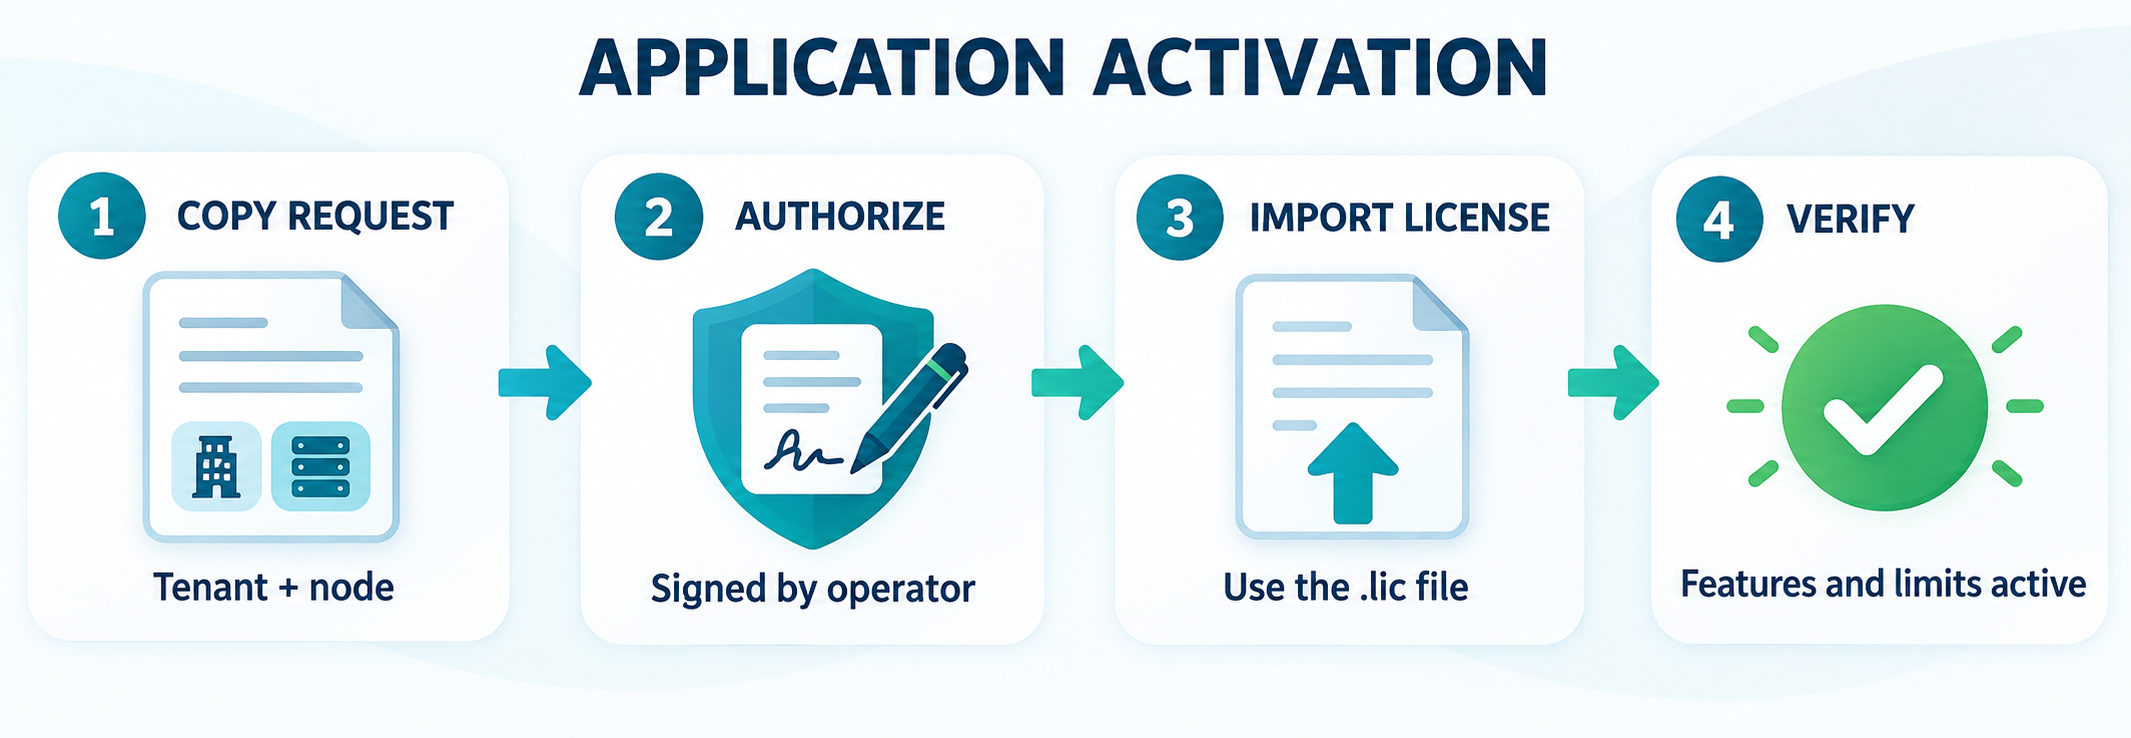
🔎 Understand the Activation panel
The panel shows the installation's Node Info, current license status, and, when a license is installed, its tenant, issue date, capabilities, and expiration. The node identifies this License Center installation. The tenant and node in the signed application license must match the current workspace and installation. Use Show license to inspect the decoded payload when you need to review the edition and numeric limits.
The status has the following practical meaning:
| Status | Meaning |
|---|---|
| License valid | The signature, tenant, node, and expiration are valid. Licensed capabilities and limits are in effect. |
| No license | No application license is installed. Protected operations remain read-only. |
| License invalid | A token is present but cannot be accepted, for example because it is expired, malformed, or belongs to another tenant or node. |
| Development mode | Development configuration is supplying capabilities without a production application license. Do not treat this as a production activation. |
🖥️ Activate this installation
- Open Settings · License and select Copy activation request.
- Send the complete request JSON to the external activation issuer through the approved licensing channel. Do not edit it; it includes the tenant and node to which the license will be bound.
- Save the signed
.licfile returned by the operator. - Select the Upload license button in the License panel and choose the
.licfile. License Center first checks that the file contains a License Center token, then validates its signature, tenant, node, and expiration before storing it. - Confirm that the panel shows License valid. Open Show license and review the tenant, capabilities, limits, edition, and expiration against the approved order.
Example: A standalone Northwind Media server requests the
tenant-products capability with limits of 5 administrators, 25 users, 10
products, and 100 active licenses. After importing the returned file, the panel
should identify Northwind Media, show the expected capability and expiration,
and allow protected product operations up to those limits.
🔄 Renew or replace an activation
Import the replacement .lic file using the same upload action. The new token
becomes the stored application license; customer records are not copied or
recreated. Obtain a fresh activation request when the workspace identity or
installation node has changed. A token issued for the old tenant or node will
not validate on the new installation.
Removing the stored license immediately returns License Center to read-only mode for protected operations. Existing data is not deleted, but administrators cannot continue protected changes until a valid license is installed.
See Application activation for the standalone, hosted, and renewal flow.
✍️ Signing
Signing proves that a product license was issued by the expected vendor and was not changed afterward. A signing profile names the issuer and format and holds the active key used by one or more tenant-owned products. The private key creates signatures; the corresponding public key lets applications verify them.
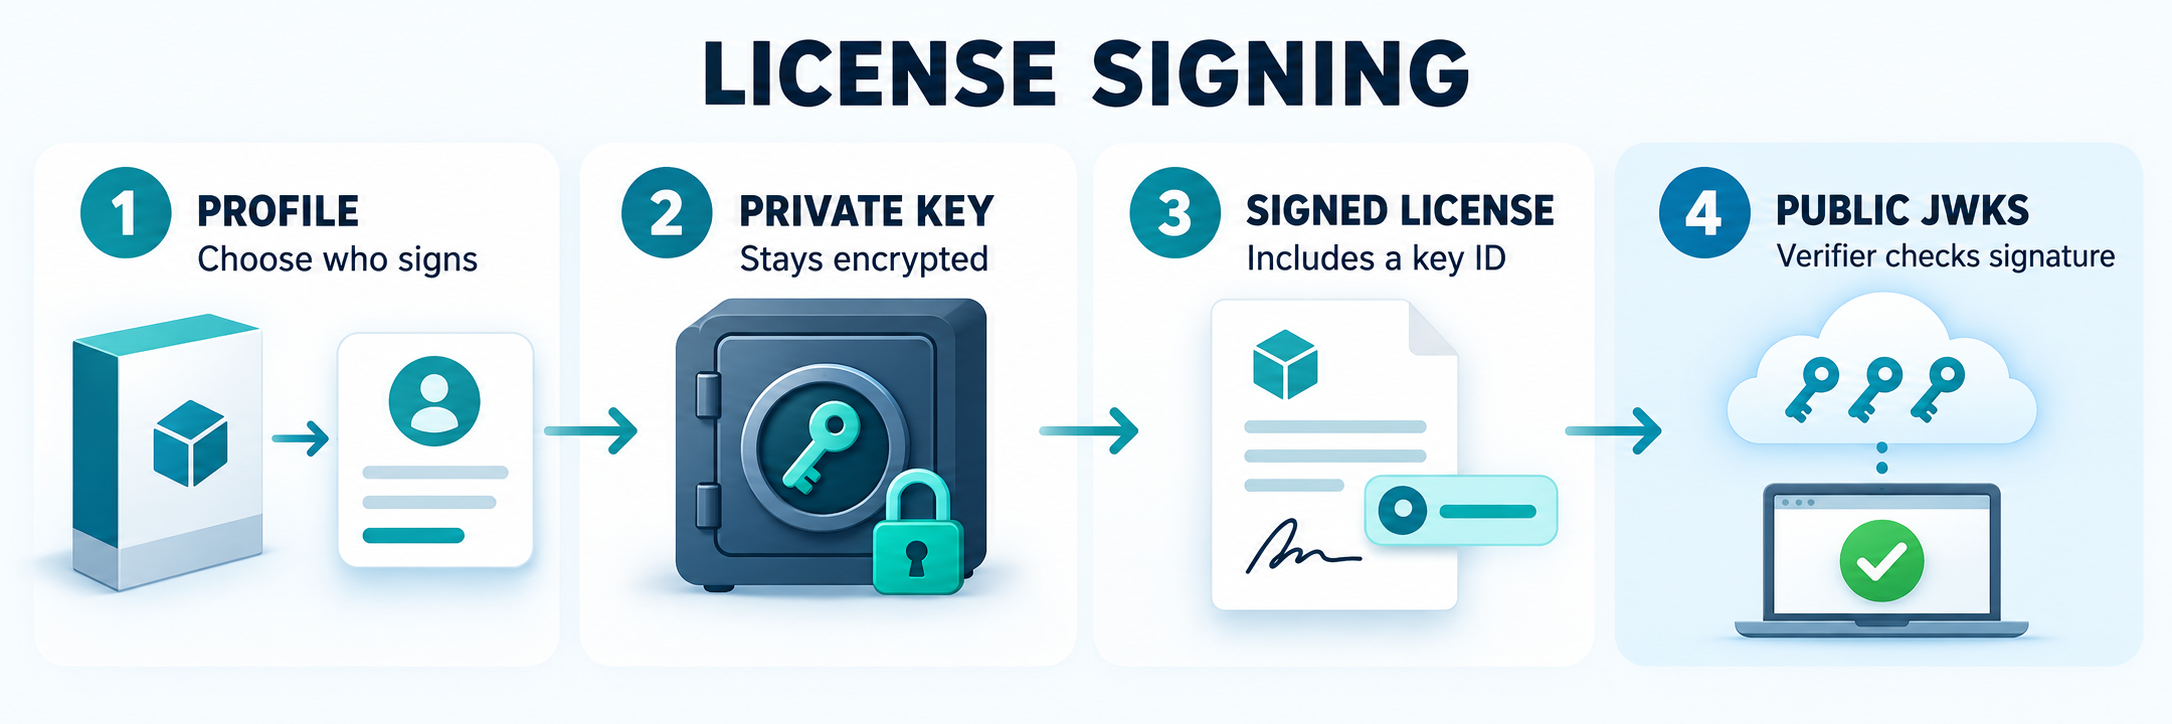
🗝️ How signing works
- A tenant administrator creates a signing profile and gives it a recognizable name and issuer.
- The administrator generates a new RSA key or imports an existing private key. License Center encrypts the private key at rest.
- A tenant-owned product is bound to that profile from the product editor.
- When License Center issues a license, it signs the license with the profile's
active private key. Vendor RS256 v1 includes the key identifier (
kid); Legacy License Manager RS256 omits it. - The receiving application reads the tenant's public JWKS, selects the public
key with the matching
kid, and verifies the signature. The private key is never sent to the receiving application.
➕ Create a signing profile
- Open Settings · Signing profiles and select New profile.
- Enter a short Profile name that administrators can recognize, such as
Northwind production signing. - Enter the Vendor issuer expected by the software that will verify the license. The name and issuer must each be unique within the tenant.
- Add a description that explains the profile's owner or intended products.
- Choose Vendor RS256 v1 for current tenant-owned product licenses. Use Legacy License Manager RS256 only when the target product requires that compatibility format.
- Create the profile, then add its active key by choosing Generate or Import.
A new profile without a key shows No active key and cannot sign licenses.
After a key is added, the profile shows Active and its kid.
🔑 Generate a new key
Choose Generate when License Center should create and manage a new RSA-3072 key:
- Enter an export passphrase of at least 12 characters.
- Select Generate.
- Copy the encrypted PKCS#8 private-key export while the one-time dialog is open.
- Store the export and its passphrase in separate approved secret-management locations.
License Center stores an encrypted working copy for signing. The downloadable export is shown only once and cannot be reopened later. Generating another key for the same profile makes the new key active and retires the previously active key.
Never paste a private key or its passphrase into chat, email, tickets, logs, or product notes. Losing both the managed key and its one-time export can make it impossible to reproduce that signing identity after a disaster.
📥 Import an existing key
Choose Import when the vendor already has an approved RSA signing identity:
- Paste the RSA private key in PEM format. RSA keys must be at least 2048 bits.
- Enter the private-key password when the PEM is encrypted.
- Optionally paste the public key. When supplied, License Center checks that it matches the private key instead of accepting a mismatched pair.
The imported private key is encrypted at rest and is not offered as a new download. Keep the organization's original protected backup. Importing a key also makes it the active key for that profile and retires the prior active key.
🔗 Bind a profile to a product
Open Products, create or edit a tenant-owned product, and select the active profile in Signing profile. Binding the profile explicitly is especially important when the tenant has several active profiles; otherwise License Center cannot safely decide which vendor identity should sign the product.
Example: Northwind has separate desktop and server products that are
verified by different applications. Create Northwind desktop signing and
Northwind server signing, add a key to each, then bind every product to the
matching profile. A desktop license will contain the desktop key ID and will be
verified with that profile's public key.
🛡️ Public verification and key rotation
Public keys are published through the tenant's license JWKS endpoint. It is safe and necessary for verifiers to read these public keys; private keys are never included. Retired public keys remain available so existing licenses can still be verified after rotation.
Before rotating a key, confirm that verifiers select keys by kid and refresh
the JWKS when an unfamiliar key ID appears. After generating or importing the
replacement, issue a test license and verify it in the target application
before using the new key for production volume.
Received orders authorize limited use of another tenant's signing key without exposing the key. See Products and Signing.
🔒 Security and sessions
Session lifetimes are deployment settings, not controls on the Settings page.
The operator sets LICENSE_CENTER_SESSION_MAX_DURATION (default 720h, 30 days)
and LICENSE_CENTER_SESSION_IDLE_TIMEOUT (default 168h, 7 days). The idle
timeout cannot exceed the maximum duration. Restart the service after changing
its environment configuration.
✉️ Email server
Set the SMTP host, port, connection security, optional credentials, sender email, and sender name. Saving with email sending enabled tests the connection and credentials before saving; Test connection tests the saved settings. Leaving the password blank during a later edit preserves the stored secret.
The email-sending switch allows delivery to be disabled without removing the configuration. Manual license sending then displays an email preview instead of delivering a message. A preview is not a successful delivery in Emails. Maintenance reminder sending requires email delivery to be enabled.
📝 Email templates
Choose Email Templates at the right of the bottom action row, beside Test connection, in Settings → Emails. Templates belong to your tenant and can be managed by tenant administrators. The initial occasion is Send license.
Edit the template name and subject, then use Visual for formatted text, HTML for supported message-body markup, or Preview to see the complete email with sample customer and license details. The tenant heading, styled frame, license-details section, and footer are included automatically. Images, custom CSS, scripts, and full HTML document wrappers are not supported. Unsupported HTML produces an error instead of being silently removed.
Use Insert placeholder in the subject or message. Available placeholders are
{{customer_name}}, {{customer_email}}, {{product_name}},
{{license_title}}, {{order_reference}}, {{node}}, {{options}}, {{expiry}}, and
{{tenant_name}}. Customer names use the recipient’s current first and last
name when provided, falling back to their username. Placeholders are text values; they cannot be used in link
addresses or other HTML attributes. Missing optional details are omitted from
the automatic details section, and perpetual licenses show Does not expire.
For order-backed licenses, an Order line shows the WooCommerce order number
when available, otherwise the order transaction ID. Directly issued licenses
omit this line and have an empty {{order_reference}} value.
New starts with the default email for the selected occasion. Duplicate copies the current template. Save a template and choose Use for Send license to activate it for both automatic issuance emails and the manual Send license action. Only one template is active for this occasion. Inactive custom templates can be deleted; the built-in template can be restored with Restore default.
Emails contain HTML and plain-text alternatives and attach the signed .lic
file. Manual sending retains CC, BCC, and the optional additional message.
Template content and the active selection are included in backups.
📨 License Center invitations
Select License Center invitation in Email Templates to edit or preview the invitation sent for WooCommerce orders. Save an alternative and choose Use for License Center invitation to activate it. This selection is separate from Send license. Existing tenants receive the new built-in template without losing their saved license emails.
When an order is imported or updated with WooCommerce status Processing, an invitation is scheduled if at least one matched, enabled product has Send invitation enabled. One email covers all qualifying products. It greets the customer by their profile name and includes the order number, product names, and an Open License Center link. The link includes the customer's username and prefills Username or email on the login screen. No license is attached; the customer signs in and issues it from their order. Existing payment and license-issuance requirements still apply.
The invitation supports {{customer_name}}, {{customer_email}},
{{order_reference}}, {{product_names}} (or {{product_name}}),
{{tenant_name}}, and {{license_center_url}}. Values inserted into HTML are
escaped. The clickable License Center link is added automatically, using the
server's LICENSE_CENTER_PUBLIC_URL. Configure this as the customer-facing URL.
Delivery needs tenant email-server settings and an active customer account linked to the order. Guest orders without such an account cannot receive an actionable invitation; the reason is recorded in Logs. Successful invitations appear in Emails. Repeated order updates do not resend a successful invitation. Failed attempts leave the order intact and are recorded in Logs; after fixing the problem, synchronize the order again or send a new Processing update to retry. There are no timed delivery retries. An order that leaves Processing before delivery is skipped.
Pending invitations and delivery records are included in backups. Delivery runs after the order commits, outside the webhook request, so mail-server delays do not delay the webhook acknowledgement.
📅 Maintenance renewal reminder
The Maintenance renewal reminder template explains that the customer's 12-month maintenance period is ending soon and recommends renewing before expiry to maintain uninterrupted technical support, software updates, and improvements. It invites the customer to contact you for renewal assistance. When an order has multiple products, their distinct names are shown as a comma-separated list.
Set the tenant's Maintenance renewal rate on the Emails settings tab. It defaults to 18%. For WooCommerce orders, License Center applies this rate to the matched software line totals after discounts, excluding tax and shipping. The renewal amount uses the original order currency and its currency precision. If any nonzero product line is unmatched, or the order does not have WooCommerce line pricing, the reminder omits the calculated-price paragraph.
Edit, preview, duplicate, or restore this template in Email Templates. It
supports {{customer_name}}, {{customer_email}}, {{product_names}}, and
{{tenant_name}}. Pricing can be included with {{maintenance_rate}},
{{maintenance_total}}, or {{maintenance_offer}}; the combined offer is blank
when a reliable amount is unavailable. {{product_name}} remains available as a compatible alias
for existing templates. Optional order details can be included with {{order_name}}
and {{order_date}} when they are available. Send customer reminders manually
from Orders · Edit order · Reminders. Automatic checks alert administrators
about due orders on startup and every 24 hours; they do not send the customer
reminder. See Orders and Entitlements.
🔌 WordPress and WooCommerce
Enter the WordPress site URL plus the WooCommerce consumer key and secret. Test the connection before synchronizing users or orders. The credentials must have read/write permission: after every tracked product and option balance for an order is issued, License Center changes the WooCommerce order status to Completed.
The license operation remains successful if WooCommerce is temporarily unavailable. License Center stores the pending completion and retries with increasing delays until WooCommerce accepts it. If balance is restored before the remote update succeeds, the pending completion is cancelled.
On a publicly reachable server, generate a webhook secret and create two active WooCommerce webhooks:
- Order created
- Order updated
Use the displayed delivery URL and the same generated secret for both. Rotating the secret invalidates the previous value immediately, so update both webhooks as part of the same maintenance change. License Center records the completed status and refreshes open order lists as soon as WooCommerce confirms the API update. The Order updated webhook continues to synchronize later changes.
If status changes arrive late, inspect WooCommerce · Status · Scheduled
Actions for pending or failed woocommerce_deliver_webhook_async jobs and
the webhook delivery logs for response codes. WordPress needs a working job
runner; an infrequent cron schedule can delay delivery even when License
Center is reachable. Incoming webhooks use the order's billing data without
waiting for a separate customer lookup; use customer synchronization for full
customer profile enrichment.
Standalone desktop mode cannot receive internet webhooks. Connect the desktop to a server with a public HTTPS URL when webhook delivery is required.
💻 Client
Browser users can install the PWA and request notification permission. The static application shell may be cached, but authenticated API calls and mutations are excluded. Administrators receive an in-app notification inbox for access requests, new orders, order status changes, maintenance reminders due, license issuance, and successful license email delivery. Open the bell and select Enable to receive the same alerts when the PWA is in the background. On iPhone or iPad, first add License Center to the Home Screen and open the installed PWA; iOS does not offer Web Push permission in a regular Safari tab.
💾 Backup
Platform administrators can download an encrypted full-installation backup or restore one. Backups include every organization, database record, persisted secret, signing key, activation state, and the node identity. Restore replaces the complete installation and signs everyone out. See Security and Backup before using these actions.
🛠️ Admin
Reset license activity restarts the current tenant's two dashboard activity charts after confirmation. It cannot be undone. Issued licenses, order balances, and logs are unchanged. This is not a database reset or a way to return purchased balances. Platform administrators also use Tenants here to open tenant management. See Dashboard, Search, and History.